Azure File Shares provides cloud-based file shares using the SMB (server message block) protocol native to Windows clients and servers. Of course, a file share needs actual files and data to share. To that end, Microsoft has provided the AzCopy command-line utility to copy, move, and sync data up to Azure File Shares.
Capabilities
AzCopy has many different capabilities. A few of the common ones are listed below and a bit about how they work.
- azcopy benchUseful to understanding how quickly a large amount of data can be transferred is the built-in benchmarking command. Running entirely in memory with configurable file counts and sizes, simply choose a destination and run the benchmark to see transfer statistics.
- azcopy copyOne of the most widely used commands is copy. The most simplistic form is simply providing a source and destination without any flags. Beyond just transferring local files to a remote Azure File Share, it’s possible to transfer between different shares such as Azure Blobs and Azure File Shares without transferring files local.
- azcopy jobsEvery transfer operation done by AzCopy creates a job which can be managed via the set of sub-commands to jobs. You can list all jobs, show a particular job, resume a paused job, remove an existing job, or clean older jobs.
- azcopy listIt’s possible to list the files contained within an Azure Blob, but not currently in an Azure File Share.
- azcopy makeThe ability to create a container or file share within a Blob or File Share. This may be better done using other tools, but allows for the quick creation of a new folder.
- azcopy removeRemove files from an Azure storage account. This command also has the ability to run this recursively and with include and exclude patterns that offer more precise control over exactly what should be removed.
- azcopy syncOnly available for Azure Blobs currently, this command allows for only transferring files that are newer than the last modification date. This does not delete files though, only overwriting of new files, if defined.
Getting Started
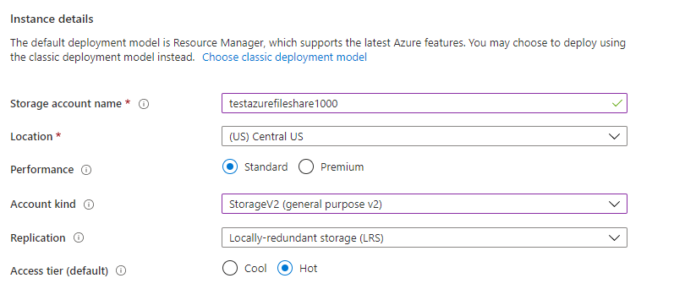
If you haven’t already created an Azure File Share, you can simply choose the Storage account – blob, file, table, queue resource type and choose StorageV2, if Standard, or FileStorage for better performance (at a higher cost), if using Premium. All other settings can be left as their defaults to quickly get started.
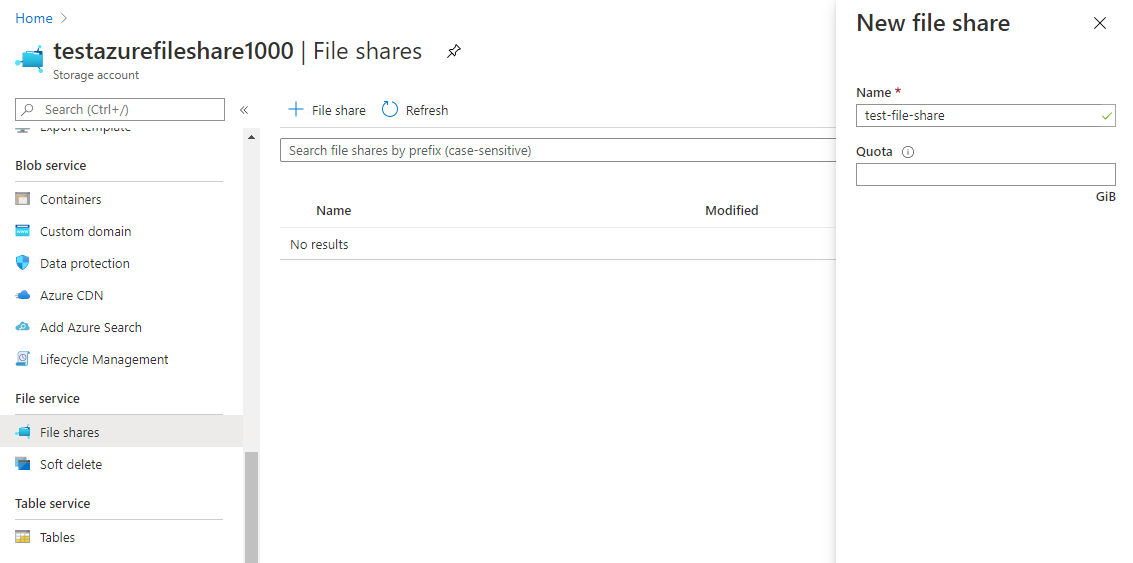
After the Storage Account has been created, an Azure File Share needs to be provisioned. Navigate to your newly created Storage Account and locate the File shares menu item. Click on the plus sign next to File share and create a new Azure File Share.

Finally, locate the Shared Access Signature (SAS) section. A SAS key is the only allowed authentication method for AzCopy and Azure File Shares at this time.

Copy the File service SAS URL for use with AzCopy. When using AzCopy, you will then append the SAS token to the end of the URL.
Common Operations
There are a couple of common scenarios that one might use AzCopy with and File Shares. Below are a few examples to illustrate how AzCopy works.
Copying Files
The simplest, but often most common, is that of copying files from a local system to an Azure File Share.
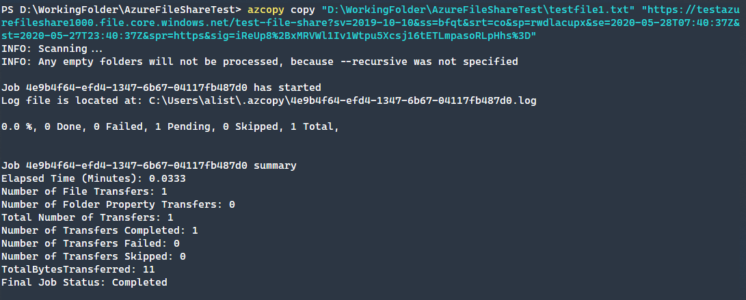
azcopy copy “D:\\WorkingFolder\\AzureFileShareTest\\testfile1.txt” “<https://testazurefileshare1000.file.core.windows.net/test-file-share?sv=2019-10-10&ss=bfqt&srt=co&sp=rwdlacupx&se=2020-05-28T07:40:37Z&st=2020-05-27T23:40:37Z&spr=https&sig=iReUp8%2BxMRVWl1Iv1Wtpu5Xcsj16tETLmpasoRLpHhs%3D>”
As you can see, this command transferred a single small file. All that was required is the SAS URL and the test-file-share container previously created as an Azure File Share.
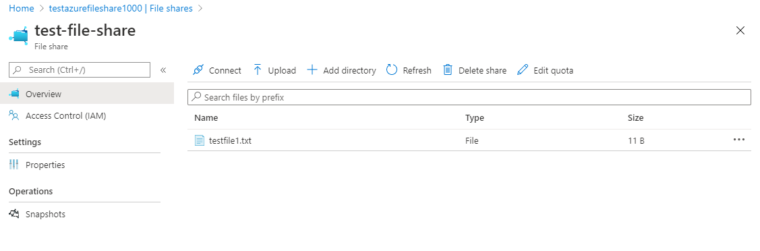
To confirm that the file was uploaded, you can navigate to the File Share itself within the Azure Portal and on the Overview page, see the files that were uploaded.
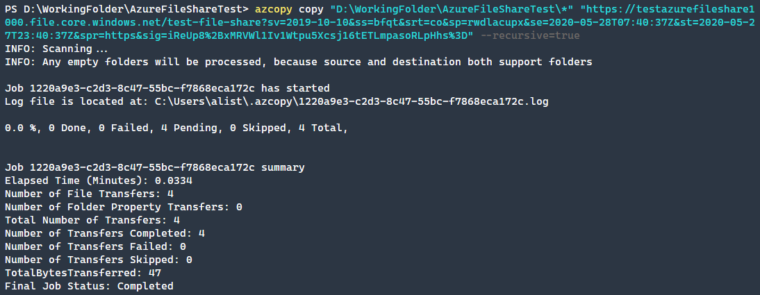
To recursively upload a series of files, all that is required is adding the –recursive=true parameter to the existing command that was just run and leaving off the explicitly defined file.
azcopy copy “D:\\WorkingFolder\\AzureFileShareTest\\*” “<https://testazurefileshare1000.file.core.windows.net/test-file-share?sv=2019-10-10&ss=bfqt&srt=co&sp=rwdlacupx&se=2020-05-28T07:40:37Z&st=2020-05-27T23:40:37Z&spr=https&sig=iReUp8%2BxMRVWl1Iv1Wtpu5Xcsj16tETLmpasoRLpHhs%3D>” –recursive=true
If you do not specify \\* at the end of the local file, and only leave the trailing slash, then the entire folder and it’s contents will be uploaded. This may not be intended if you do not want to create the folder on the remote file share as well.
 Listing Files
To show all files, simply use the list command. In this example, we are appending the –running-tally command which will also show a summary of the number of files and their sizes.
azcopy list “<https://testazurefileshare1000.file.core.windows.net/test-file-share?sv=2019-10-10&ss=bfqt&srt=co&sp=rwdlacupx&se=2020-05-28T07:40:37Z&st=2020-05-27T23:40:37Z&spr=https&sig=iReUp8%2BxMRVWl1Iv1Wtpu5Xcsj16tETLmpasoRLpHhs%3D>” –running-tally
Removing Files
Now that we have uploaded a number of files, perhaps we don’t need them anymore and should remove all of the one’s that we have uploaded.
azcopy remove “<https://testazurefileshare1000.file.core.windows.net/test-file-share/*?sv=2019-10-10&ss=bfqt&srt=co&sp=rwdlacupx&se=2020-05-28T07:40:37Z&st=2020-05-27T23:40:37Z&spr=https&sig=iReUp8%2BxMRVWl1Iv1Wtpu5Xcsj16tETLmpasoRLpHhs%3D>” –recursive=true
Note that we are only passing in the SAS URL, with the /test-file-share/* pattern to remove all files.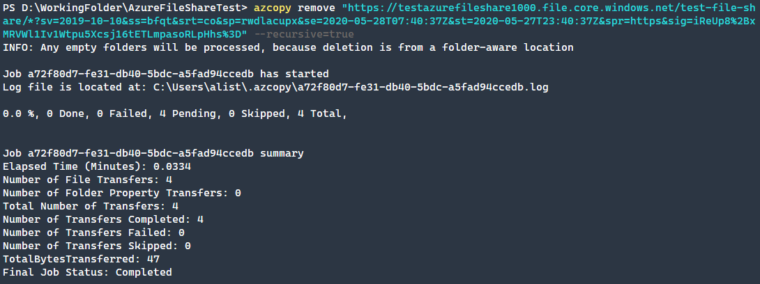
Conclusion
AzCopy makes transferring files to an Azure File Share easy and reliable. With a multitude of options, most scenarios that a system administrator would need to support Azure File Shares will be supported. As this tool is regularly updated, new capabilities and features are being added all the time. Easy to integrate into scripting environments, such as PowerShell, AzCopy will quickly become indispensable to any Azure File Share deployment.